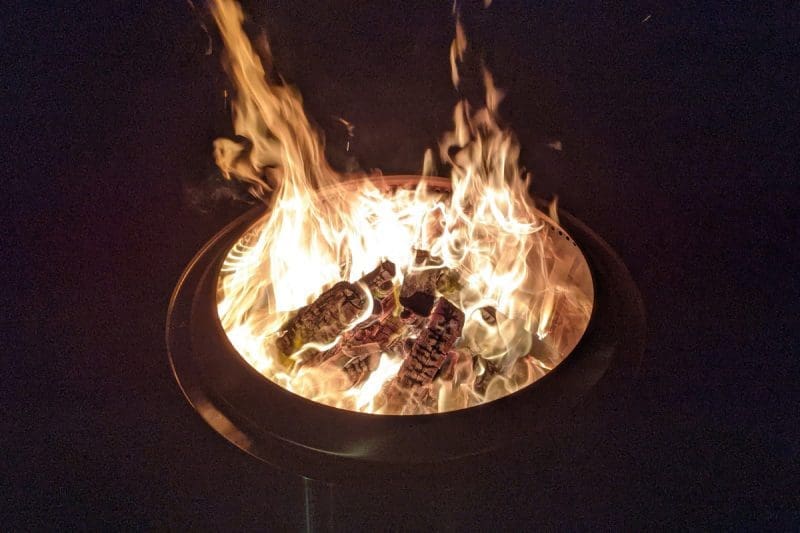

Is your Solo Stove smoking?
In case you’re just starting out with Solo Stove fire pits and somehow your Bonfire, Yukon or Ranger aren’t aligning well with your expectations of a smokeless fire pit, there’s a chance that you need to refine your fire-building skills.
Unfortunately, your Solo Stove smoking could result from one issue or four, but either way, we’ll jump in, cover each, and I’ll show you what to do.
Solo Stove smoking typically results from using wet/unseasoned wood, burning softwoods, overfilling beyond air inlet holes, or insufficient coal bed. These factors disrupt the stove’s engineered airflow system necessary for efficient secondary combustion. Using dry hardwoods and maintaining proper fill levels ensures optimal smoke-free performance.
Just remember, all Solo Stoves and smokeless fire pits produce some smoke.
No fire pit magically makes any type or condition of wood smokeless. Achieving a fully smokeless fire is not yet possible.
Keep in mind: smokeless doesn’t mean no smoke at all.
Let’s jump in…
Table of contents

The Details: Why is my Solo Stove Smoking?
Four main drivers make Solo Stove fires smoke, but you can easily fix them all.
These tips will become second nature as you build more low-smoke fires.
Fix one issue at a time, and you’ll drastically reduce your Solo Stove’s smoke.
Reasons Why You Have Bad Solo Stove Smoking
Don’t worry if these smoke issues look familiar – they’re common and fixable.
I’ve made every mistake possible, so you don’t have to – you’ll achieve smokeless fires quickly.
We’ll cover this four one by one – here we go.

1. You Are Using Unseasoned Firewood
What is unseasoned firewood, you ask? Well, for our purposes here, it’s firewood with a moisture content of higher than 30%.
Twenty percent (20%) is ideal, but you won’t find that number usually unless you are looking at kiln-dried firewood.
Poorly seasoned firewood does not burn well, and when wood doesn’t burn well, it smokes a lot.
If you are buying firewood from a supplier, you want to be in that 30% or less range, ideally.
Sometimes you’ll get there, and sometimes you won’t (unless you are buying kiln-dried firewood, that is).
Smokeless fire pits are more accommodating of varying firewood quality and moisture content than traditional pits.
Solo Stoves’ efficient burn dries wet wood better than regular fire pits, improving the combustion of less-seasoned firewood.
Once moisture is rapidly extracted from the wood, smoke production significantly decreases under specific conditions discussed later.
Regular fire pits will smoke and smoke until the fire goes out. They just don’t get hot enough at the beginning to deal with the moisture in imperfect wood.

2. You Are Using Softwoods as the Main Firewood Source
Softwoods like spruce, firs, pines, cedar, etc., are pitchy, meaning they’ve got sap that’s going to make your fire smoke.
Not only that, softwoods, once ignited, burn extremely hot and fast. Not an ideal situation for a long night by the fire.
With that said, softwood kindling can be very useful in getting a fire started. This is where the hot and fast combo comes in handy.
Otherwise, I wouldn’t use softwoods as your main fire pit fuel source unless that’s all you have.
I occasionally use piñon in my fire pit for its intense heat and longer burn time compared to typical softwoods.
Also, piñon smoke repels mosquitoes, offering relief in mosquito-prone areas.
Now we are getting into the meat and potatoes of the article with the next two items.
Both are easy to do and will have the biggest impact on whether your Solo Stove smokes heavily or not.

3. You are Building the Firewood Stack Too High
Solo Stove smokeless fire pits burn off smoke in a process called secondary burn.
Hot air rises through double walls, exiting top holes to burn smoke before it escapes the fire pit.
Stacking wood above the air holes in a smokeless fire pit prevents proper secondary combustion, causing smoke.
Keep the top of your firewood below these holes to take full advantage of your Solo Stove’s secondary combustion capabilities.
I generally keep the fire about 3 inches below the top air holes, regardless of the Solo Stove model.
It’s a lot easier to do on the larger models.

4. You are Not Building a Hot Coal Bed Before Adding the Main Firewood Source
This is my number one tip for any new Solo Stove user. A super-hot coal bed is the key to a truly smokeless fire.
What is a coal bed? If you’ve grilled over charcoal in the past, then you know what I’m talking about.
A coal bed in your fire pit is going to be those blazing hot embers that line the bottom of your Solo Stove Bonfire, Yukon, or Ranger. <— link to my review of the Solo Stove Bonfire 2.0
A hot bed of coals dries out your wood fast, cutting down smoke and keeping the fire going strong.
With a good hot coal base, your Solo Stove fire burns better and keeps going until you’re done adding wood.
Coal beds are best built slowly at the beginning of the fire.
I start building my coal beds with tinder and kindling and slowly add smaller firewood splits (I use beech for this most of the time) that have been quartered to the fire as it starts to establish.
Once you’ve been feeding smaller pieces of wood like the splits I mentioned for about 20 minutes or so, you should start seeing a solid coal bed forming.
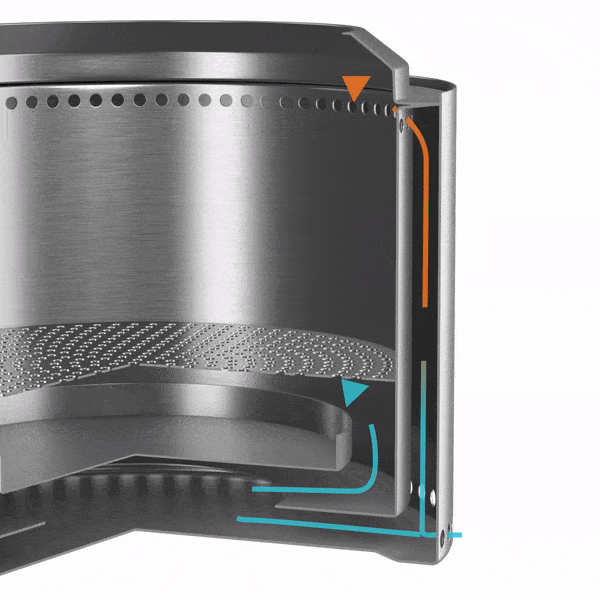
Image Credit: Solo Stove
How Do Solo Stoves Work?
I’ll cover this briefly here, but I’ve got an article on the subject of smokeless fire pits that covers how Solo Stoves work if you are looking for a little more detail.
Solo Stoves, as currently designed, are based on a wood-burning stove technology called Top Lit Updraft Gasification or T.L.U.D. <— link to University of Florida publication on TLUD technology
These wood-burning stoves were designed to pull air through the base of the stove by creating a vacuum inside the fire pit by starting a fire.
This air, once inside the stove, is channeled to vents at the base of the fire, with some of the air traveling up the stove’s double wall.
The air going to the base of the fire helps the fire burn more efficiently.
Regular wood-burning fire pits don’t have this ability, pulling air from all directions except the bottom of the fire where it is the most effective.
The air that heads up the double wall toward the top of the stove and exits through interior vent holes feeds a second burn aimed at smoke reduction.
The original TLUD stoves, designed for use in the developing world by Dr. Paul Anderson, helped to maximize the effects of the wood fuel available while also making it cleaner, burning, and healthier for users.

Image Credit: Engineering for Change
Solo Stove and a number of its competitors have harnessed the capabilities of TLUD design by carrying it over the residential backyard fire pit market.
Again, for more on TLUD and its connection to current smokeless fire pits, please check out the article I mentioned earlier.

Best Low Smoke Firewood for Solo Stoves
Before I wind the article down, I wanted to quickly cover what I believe are among the best firewood types for a Solo Stove smokeless fire pit.
Earlier I mentioned what types of wood not to use, so I wanted to balance that out with a list of wood recommendations.
I chose these three firewood types because they are plentiful (at least around the U.S), have high BTU ratings, are great for building a hot coal bed, and are naturally low smoking.
| Low Smoke Firewood Species | BTU Rating | Notes |
| Shagbark Hickory | 28 | Excellent coaling; hard to split |
| American Beech | 28 | Excellent coaling; hard to split |
| Bur Oak | 26 | Excellent coaling; easy to split |
| Red Maple | 24 | Good coaling; easy to split |
| White Ash | 24 | Good coaling; medium splitting difficulty |
What Firewood Does the Manufacturer Recommend?
Interestingly, Solo Stove recommends juniper firewood in their fire pits.
I say they recommend it because it’s the only fire pit wood type they sell under their own branding.
What makes juniper an interesting choice is that it’s a softwood.

I’ve never used it myself, but from what I understand, it is very dense, which is a positive for firewood. Denser firewood tends to burn longer and hotter.
With a BTU rating of about 22, it’s definitely on the high-end heat-wise for softwoods, and not surprisingly, it’s got a medium smoke level.

Wrap-up: Why Does My Solo Stove Smoke So Much?
Try these tips to make your Solo Stove truly smokeless and more efficient.
Experiment freely – everyone runs their fire pit differently based on personal preference.
With practice, you’ll create Solo Stove fires with minimal smoke and plenty of warmth this winter.
Keep damp ash out to prevent your Solo Stove from smoking excessively.
Check out my article Your Solo Stove Got Rained On…Now What? for keeping your Solo Stove clean and low smoking.
Thanks for reading!
John

FAQs: Why Does My Solo Stove Smoke So Much?
To safely extinguish a fire in a Solo Stove, the best method is to let it burn out naturally.
Stop adding fuel and allow the fire to gradually die down. This approach preserves the stove’s integrity and prevents potential damage from thermal shock.
If you need to put the fire out quickly, avoid using water as it can cause warping or cracking of the hot metal. Instead, keep a bucket of dry sand nearby for emergencies.
If immediate extinguishing is necessary, carefully pour sand over the flames and embers, completely smothering them.
Spread the sand evenly using a fire poker or long-handled tool, ensuring all hot spots are covered.
Once the fire is out and the stove has cooled completely, remove the sand and dispose of any remaining ashes properly.
Always verify the fire is fully extinguished by cautiously checking for any residual heat with the back of your hand held above the ashes without touching them directly.
Letting the fire burn out naturally is the safest and most recommended method for your Solo Stove.
Cleaning your Solo Stove is essential for maintaining its efficiency and longevity. Start by ensuring the stove is completely cool.
Turn the Solo Stove upside down and gently tap it to remove any remaining ash. For stubborn debris, use a soft brush or vacuum cleaner with a brush attachment.
Avoid using water inside the stove, as this can lead to rust. Instead, wipe the interior with a dry cloth.
For the exterior, you can use a mild soap and water solution but be sure to dry it thoroughly afterward.
Pay special attention to the air vents, ensuring they’re clear of obstructions. If your Solo Stove has developed a patina or discoloration from use, this is normal and doesn’t affect performance.
However, you can use a stainless-steel cleaner if you prefer a shinier look, a mixture of baking soda and water can be effective for tough stains or buildup.
For tough stains or buildup, a mixture of baking soda and water can be effective but avoid abrasive materials that could scratch the surface.
Regular cleaning after each use prevents excessive buildup and keeps your Solo Stove functioning optimally.
Remember, a well-maintained Solo Stove looks better and burns more efficiently, reducing smoke and enhancing your outdoor experience.
Discoloration of your Solo Stove is a common and natural occurrence that shouldn’t cause alarm.
This change in appearance is primarily due to the high temperatures reached during use, which can cause the stainless steel to develop a patina.
The discoloration often manifests as a bluish or golden hue, sometimes with rainbow-like patterns, and is more pronounced in areas exposed to the most intense heat.
This process, known as heat tinting, results in a thin oxide layer forming on the metal’s surface. It’s important to note that this discoloration does not affect the stove’s performance or structural integrity.
In fact, many users appreciate this patina, which gives the stove a seasoned, well-used look. The extent of discoloration can vary based on factors such as frequency of use, types of fuel burned, and the temperatures reached.
While some may prefer to maintain the original silver appearance, attempting to remove this patina is generally unnecessary and can potentially damage the stove’s surface.
If you’re concerned about excessive discoloration or want to minimize it, ensure you use dry, seasoned hardwoods and avoid overloading the fire pit.
Regular cleaning and proper storage can also help maintain your Solo Stove’s appearance, but remember, a little discoloration is a sign of a well-loved and frequently used fire pit.